


With SALESmanago you can easily plan tasks related to particular contacts. This is one of the key elements of the CRM-oriented solution provided within SALESmanago system.
There are 4 ways of assigning tasks to a user:
A. Creating a task category
B. Adding a new task directly on the contact card
C. Task management
D. Adding tasks with Automation Rules
[A] CREATING TASK CATEGORY
In SETTINGS-> OTHER -> TASKS you can create categories for the tasks. The categories may be additionally designated with icons, which will facilitate a task management.
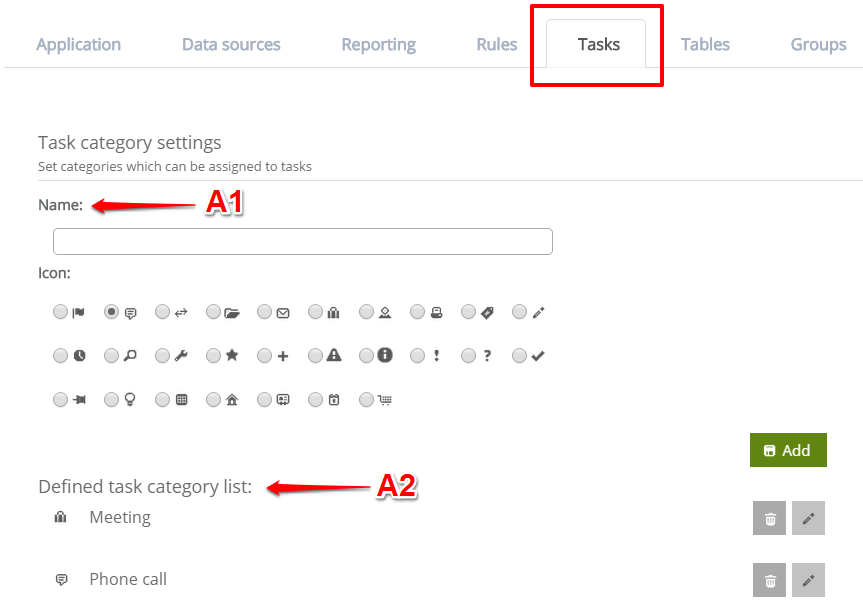
[A1] Adding categories – enter a category name, which will enable you to identify the group of tasks assigned to it. Then choose an icon.
[A2] List of categories defined for tasks – in this place you can view all created categories. Additionally, the categories can be removed or edited.
TIP: You can filter task lists by category.
[B] ADDING NEW TASKS DIRECTLY ON THE CONTACT CARD
The contact card provides a direct preview of all assigned tasks. New tasks can also be added here.

[B1] How to add a new task:
- Time – enter the task time.
- Date – enter the task date.
- Note – enter the text of the task
- Reminder – set the time period before the planned date of completing the task when you want a task notification to be emailed to you. The information will be delivered to the address you use to log into the system. You can also CC the message to another address.
- Category – select a category for the task.
[B2] Preset tasks view – enables you to view tasks.
- Information on the task being completed can be found next to the date and time as a notice showed in parentheses – (completed)
- If the task is pending, you can [a] add it to the calendar, [b] quickly change the execution date to postpone it for 24 hours, [c] edit (when editing, you can flag the task as completed), [d] remove it.
[C] TASK MANAGEMENT
By going to CRM -> TASKS AND REMINDERS you can view all tasks.
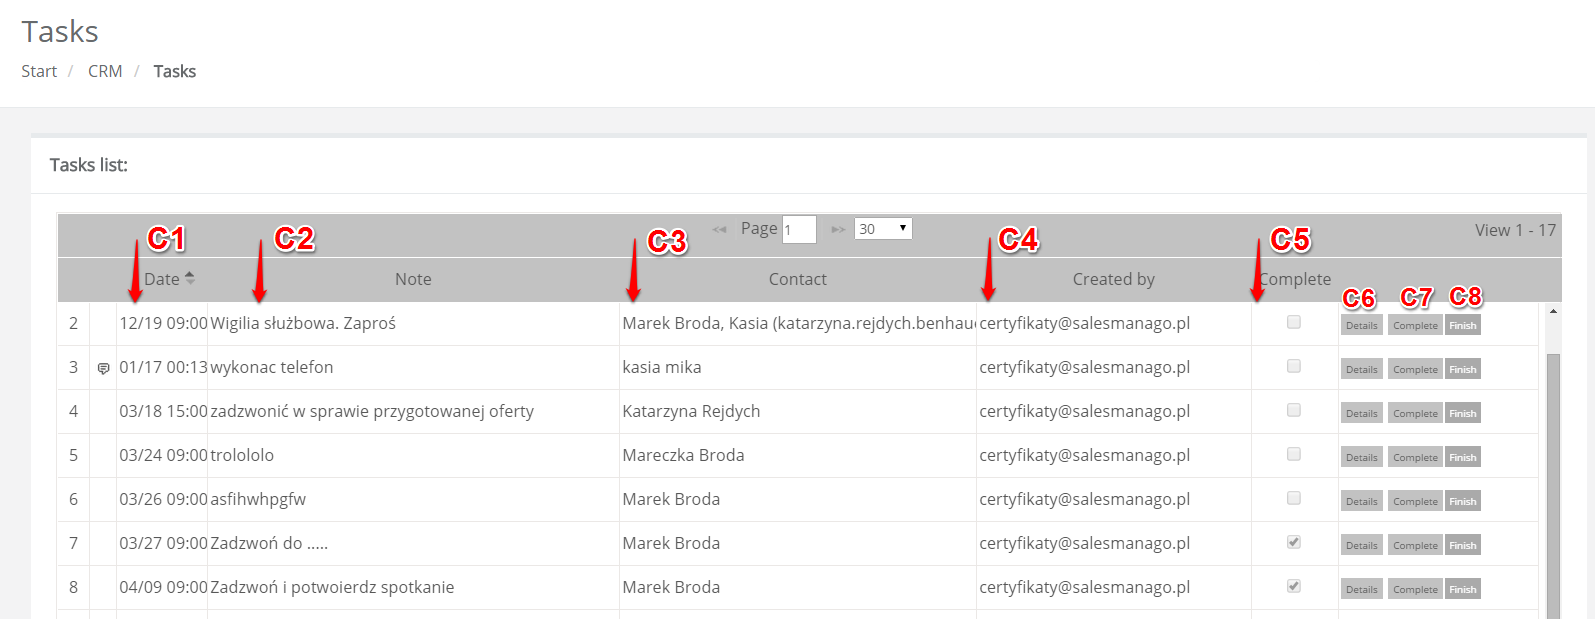
[C1] Date – time when the task is due for a completion.
[C2] Note – text entered for the task.
[C3] Contact – a specific contact the task has been assigned to.
[C4] Created by – information identifying the user who created the account
[C5] Completed – if checked, the checkbox indicates that the task has been completed.
[C6] Details – a full task preview.
[C7] Completed – here you can indicate that the task has been completed.
[C8] End – to completely remove the task from the system.
Below you can also add a new task. Enter the data of the contact to whom you want to assign a task. The field is mandatory. Information on the new task added will be shown on the contact card.
[D] ADDING TASKS WITH AUTOMATION RULES
The SALESmanago system enables automatic assignment of tasks from the level of automation rules -> Action: add task. You can use this option to set the task to be executed for a given contact once the contact has fulfilled the events and conditions defined by you.
To obtain more information on setting up tasks via automation rules click here >>