Automatic alerts with SALESmanago Marketing Automation are one of the most convenient tools to use for supporting sales departments. An alert is an email sent to the sales department. Its purpose is to inform employees of important events related to their potential customers.
Such events include:
- exceeding a specified level of scoring
- visiting a URL
- long periods of inactivity
- clicking on a link in an email
- downloading an eBook
- registering for a demo
Setting up a basic alert:

To set this action:
[1] The type of action: “send alert to user”.
[2] Alert description: enter the text of the alert, “Contact opened email”. It will be sent as a part of the alert – “Alert SALESmanago”.
[3] CC: enter other email addresses to send them a carbon copy of the alert message (255 character limit).
IMPORTANT: In the CC field (carbon copy) do not type email addresses related to the SALESmanago domain. E.g. demo@salesmanago.com or demo@salesmanago.pl
Note: The alert will be sent to the email address associated with the contact and the CC.

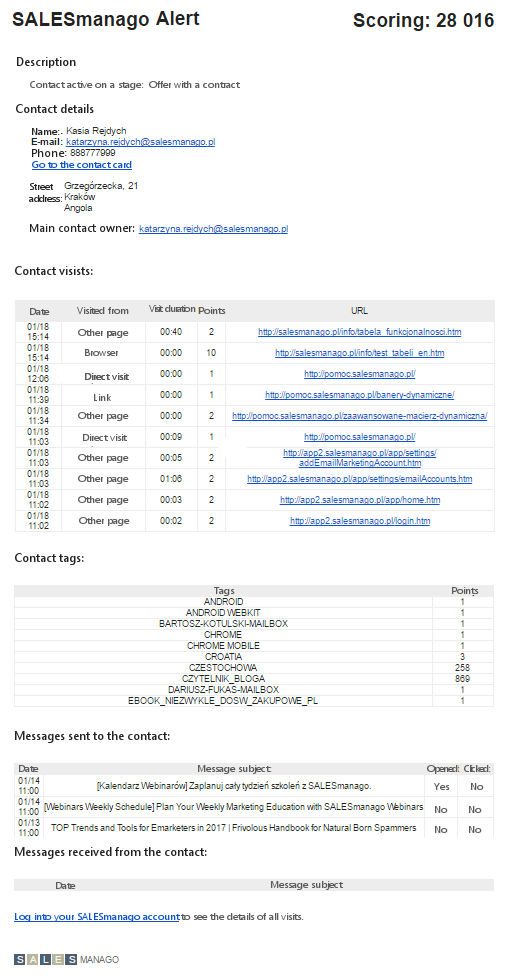
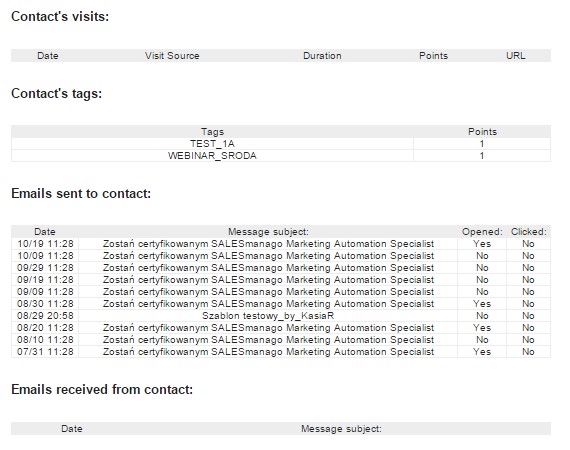
The alert contains key information on the contact, including contact details and behavioural data.
The top section of the email contains basic information.
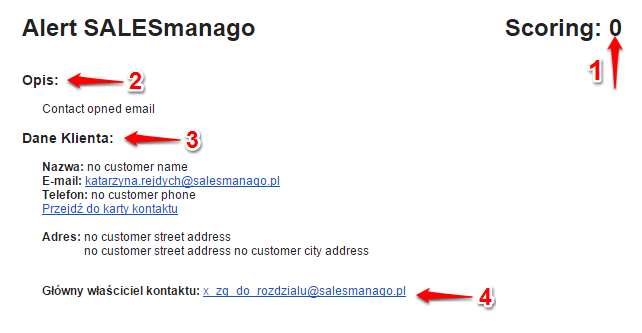
[1] Contact Score
[2] Description
[3] Contact Details
[4] Main owner of the contact
The rest of the message contains behavioural data collected by SALESmanago
- The last visit of the contact on monitored sites (the alert contains only several recent visits – the full list can be found in the system, in ‘Contact Details’.)
- Messages sent to the contact: the list also contains messages sent from proxy mail servers. The list is archived only up to 3 months. These messages can be found on the contact card in the ‘Messages’ tab after clicking on “Archives”.
ADDITIONAL OPTION
Option 1.
SEND ALERTS WITH ATTACHMENTS
You can send alerts along with attachments containing additional facts about the contact. This type of alert can be used to send contacts to external systems – for example CRMs by using the URL get method in order to send contact details. These could be basic details from the contact card – such as ‘company’ or ‘name’.
Names of individual placeholders can be found in API documentation.
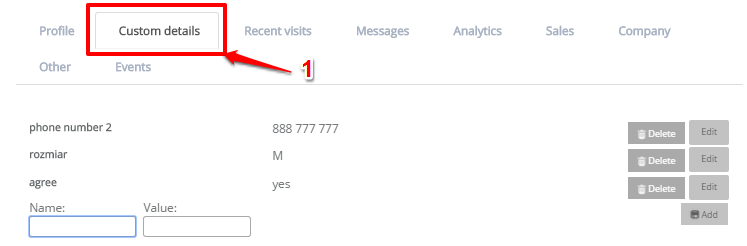
In the alert note you can also include the information as additional details on the contact card [1] (non-standard fields):
IMPORTANT: When the details of contacts are checked, the default setting is that all elements that contain (but are not limited to) the phrase are matched. It means that to the value “mechanic” the system matches also the phrase “electromechanic”. The settings can be changed easily at any time. Use prefixes enumerated below to change these settings.
- prefix any: matches any element from the list where values are separated by a comma
- prefix ex: the value of the detail must be exactly the same as the value specified in the rule
- prefix reg: here you can use regular expressions which you can find here
- prefix startswith: matches the element which starts with the expression specified in the rule
Sending data in an alert
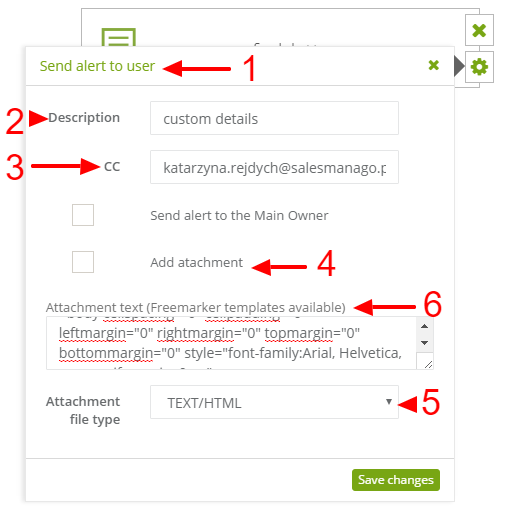
Check standard options [1], [2], [3].
Next, select the check box that will enable you to add a note as an attachment [4] and check the attachment type – in this case it is TEXT/HTML [5].
In the dialog box displaying the text of the attachment paste a correct code. The choice of code will depend on the type of data you want to see added in the attachment accompanying the alert [6].
An example HTML code:
<html>
<head>
<title>test</title>
<meta http-equiv="Content-Type" content="text/html; charset=utf-8">
</head>
<body cellspacing="0" cellpadding="0" leftmargin="0" rightmargin="0" topmargin="0" bottommargin="0" style="font-family:Arial, Helvetica, sans-serif;margin: 0px;">
<table style="width: 101%;" border="0" cellspacing="0" cellpadding="0" align="center" bgcolor="#ffffff">
<tbody>
<tr>
<td align="center">
<table style="border: 0px none; background-color: #ffffff; font-family: Arial,Helvetica,sans-serif; margin: auto; width: 600px;" cellspacing="0" cellpadding="0" align="center">
<tbody>
<tr>
<td>
<table style="font-family: Arial; width: 600px;" border="0" cellspacing="0" cellpadding="0" align="center">
<tbody>
<tr>
</td>
</tr>
<tr>
</td>
</tr>
<tr>
<td colspan="3">
<table style="font-size: 20px; color: #ed1c24; font-family: Arial; width: 100%;" border="0" cellspacing="0" cellpadding="15">
</td>
</tr>
<tr>
<td colspan="3">
<table style="width: 100%;" border="0" cellspacing="0" cellpadding="15">
<tbody>
<tr>
<td style="line-height: 18px; color: #888; font-size: 12px; font-family: Arial; border-bottom: 1px solid #f0f0f0;" height="60">Customer Advisor, <br /> customer [#if contactDetails.name??]${contactDetails.name}[/#if].<br /><br /><p>Customer's name: <span style="color: #ff0000;">[#if contactDetails.name??]${contactDetails.name}[/#if]</span>,<br />tel: <span style="color: #ff0000;">[#if contactDetails.phone??]${contactDetails.phone}[/#if]</span><br />email: <span style="color: #ff0000;">[#if contactDetails.email??]${contactDetails.email}[/#if]</span></p>
<p>
[#list contactDetails.properties as prop]${prop.name}: ${prop.value} <br/>[/#list]
</p>
</td>
</tr>
</tr>
</tbody>
</table>
</td>
</tr>
</tbody>
</table>
</td>
</tr>
</tbody>
</table>
</td>
</tr>
</tbody>
</table>
</body>
<!--"$opt-out$-->
</html>
The following command sends all details displayed on the contact card. If a given detail does not appear in additional details on the contact card, the field will remain blank.
[#list contactDetails.properties as prop]${prop.name}: ${prop.value} <br/>[/#list]
In order to send a labelled detail in an alert, use the following command:
[#list contactDetails.properties as prop] [#if prop.name == ‘detail_label’]${prop.value}[/#if] [/#list]
Option 2.
ALERT DESCRIPTION – advanced functionalities
In addition to the option of downloading all information from the contact card by means of an attachment (option 1) you can select all required data to be attached to an alert – for example, contact details.
Any additional information that you would like to add to the alert should be added to ALERT DESCRIPTION. Although the featured window is small, the amount of content that can be added is unlimited.
To download information about a particular detail, use this value:
$cst.detail_name$
You can also use other dynamic variables, such as:
contact name: $name$,
contact email $email$,
company name: $company$,
To create a detail that accepts fixed values, it is possible to create conditional set-ups, in which the message will change according to a specified detail value – for example when creating a contact form with a selectable check box, a confirmation will be sent to the program as a detail.
Example of a conditional set-up:
$name$ [#if $cst.detail_name$=’on’]Information for confirmed check box [#else]Information for unconfirmed check box[#end]
Description of conditional set-up:
in $name$ the contact name will be uploaded, next, if the detail has taken the ‘on’ value the system will display information on the status of the checkbox.
Moreover, in ALERT DESCRIPTION you can paste an HTML-coded notification on downloaded information and load it into the alert.
A finished alert should look similar to the following example: