


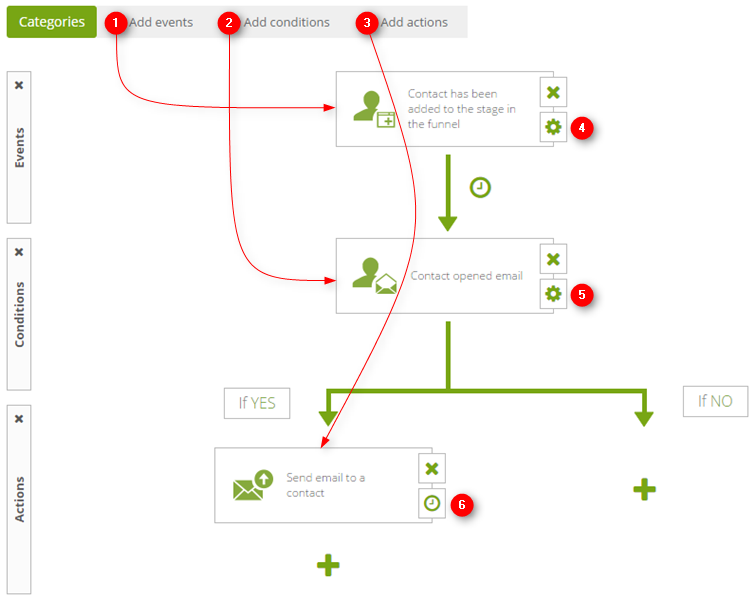
Implementing a sales funnel is a process that may require creating a number of interrelated automation rules, but it’s definitely worth the time spent. From this article, you can learn how this can be achieved – below is an example campaign with six automation rules designed to convert new contacts into leads.
Moreover, at support.salesmanago.pl/creating-sales-funnels/ you can learn how to create and analyse sales funnels.
Sending an offer relevant to contact’s interest.
The following example has two messages – an introductory message (“General offer”) and a more specific one (“Detailed offer”). Of course, the process of lead nurturing can make use of as many messages as needed.
.
STEP 1 – Creating a funnel and the first rule
To create a sales funnel go to Campaigns and Funnels → Campaigns and Funnels → Add a New Campaign.
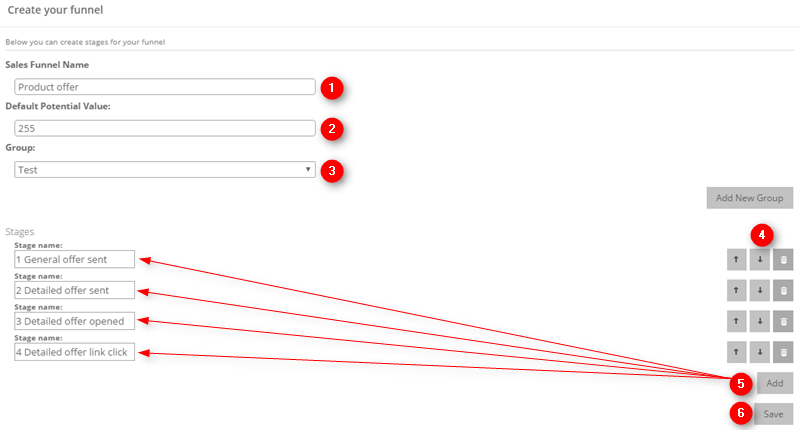
![]() Funnel name
Funnel name
![]() Potential contact value — an estimated average value of one contact in this funnel. You can adjust this value for individual contacts on their contact cards.
Potential contact value — an estimated average value of one contact in this funnel. You can adjust this value for individual contacts on their contact cards.
![]() Group — for keeping funnels in order.
Group — for keeping funnels in order.
![]() Buttons for deleting and changing the order of stages.
Buttons for deleting and changing the order of stages.
![]() Add a new funnel — the example funnel has 4 stages. Contacts were added to stage 1 manually, in Manage contacts. Contacts eventually end up in other stages as automation rules react to their behaviour.
Add a new funnel — the example funnel has 4 stages. Contacts were added to stage 1 manually, in Manage contacts. Contacts eventually end up in other stages as automation rules react to their behaviour.
![]() Save — after you finish creating the funnel, remember to save it.
Save — after you finish creating the funnel, remember to save it.
The purpose behind this funnel is to generate leads from a group of new contacts.
- On stage 1 contacts receive the general offer.
- Contacts who open the message go to stage 2 and receive the second, detailed offer. If they open both, they go to stage 3.
- Contacts who click a link in the second message go to stage 4.
- Contacts who didn’t read the general offer when they first received it will receive it again.
Now go to Automation Processes → Automation Rules → Add a New Rule.
This rule is meant to add contacts into the funnel and send them a message with the general offer. This rule has only two actions. Because it will be run manually (in CRM → Manage contacts), there is no need to add events or conditions.
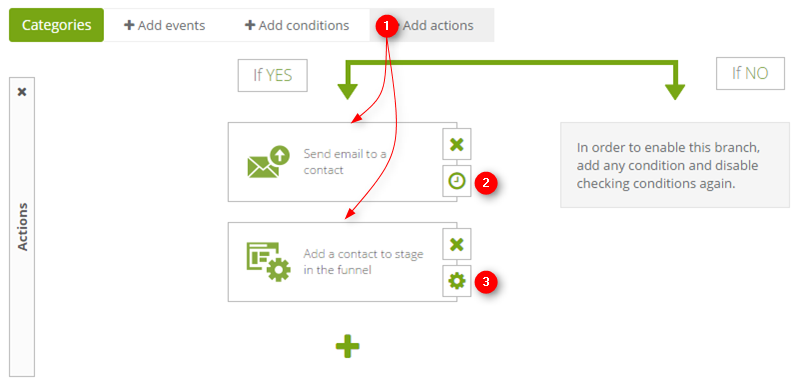
Click ![]() Add actions and find “Send email to a contact” and “Add a contact to a stage in a funnel”. Proceed to the first action’s settings.
Add actions and find “Send email to a contact” and “Add a contact to a stage in a funnel”. Proceed to the first action’s settings. ![]()
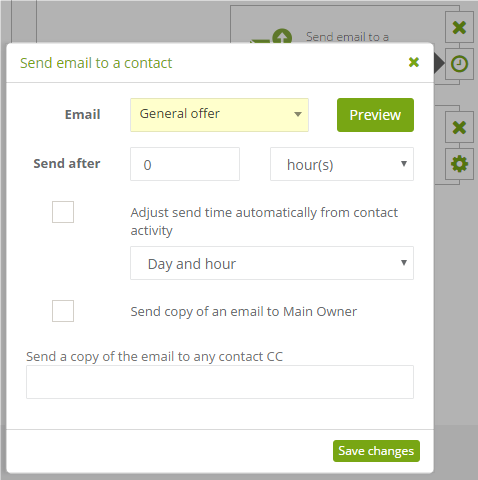
Choose a message which you want to send. For this example, the message was “General offer”. Save changes. Then open the second action’s settings ![]()
.
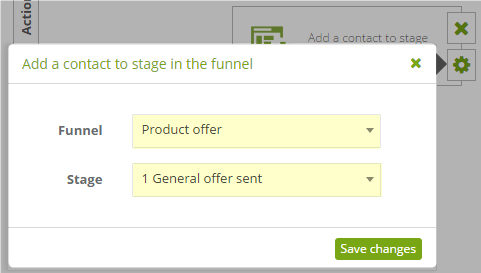
Enter the funnel you’ve made before and set Stage for the first one. Save changes. Save the rule. Then create another rule.
.
STEP 2 — Creating the second rule
The second rule aims to send the detailed offer to contacts who opened the first message and educate them further.

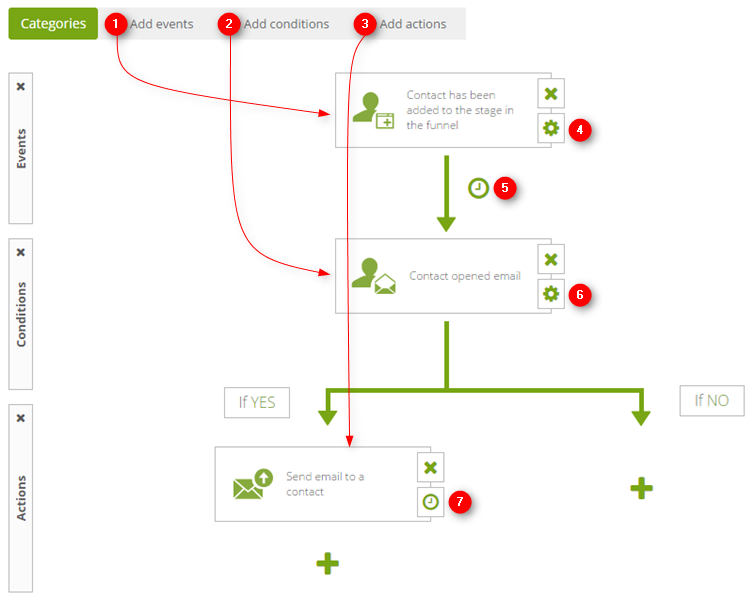
Click ![]() Add events and find “Contact opened email”. Proceed to add actions and find
Add events and find “Contact opened email”. Proceed to add actions and find ![]() — “Send email to a contact” and “Add a contact to a stage in a funnel.” Then proceed to event settings.
— “Send email to a contact” and “Add a contact to a stage in a funnel.” Then proceed to event settings. ![]()
.

Choose the message that, when opened, will count as an event. Save changes. Proceed to the first action’s settings. ![]()
.
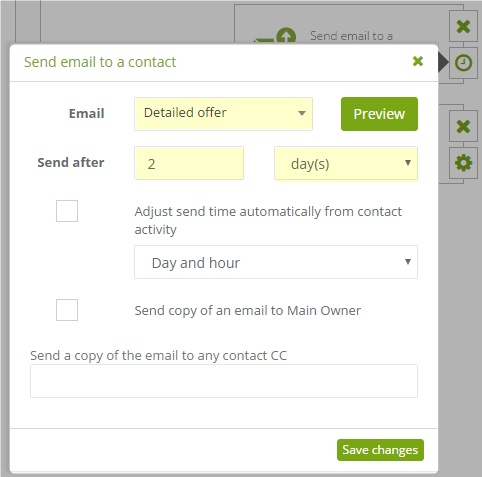
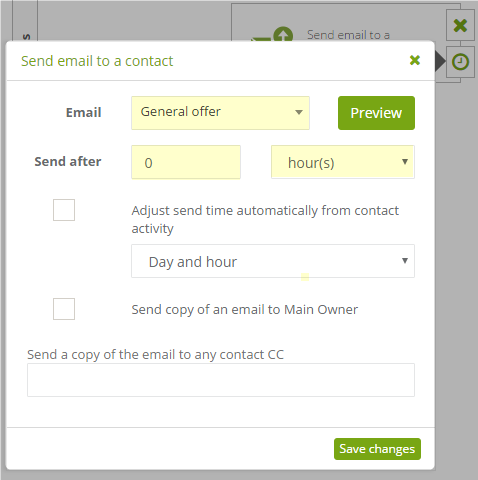
Choose a message which you want to send. For this example, the message was “Detailed offer”. Save changes. Then set Send after to a chosen value. Save changes. Then open the second action’s settings. ![]()
.
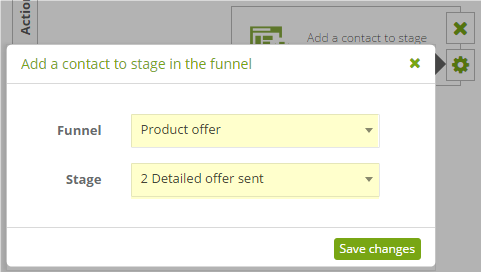
Enter the funnel you’ve made before and set Stage for the second one. Save changes. Save the rule. Then create another rule.
.
STEP 3 — Creating the third rule
The third rule was created to single out contacts who were placed at stage 1 of the funnel and received “General offer”, but did not open that message. Then the rule sends the message again – maybe some contacts want to read it, but somehow missed it.
Click ![]() Add events and find “Contact has been added to the stage in the funnel”. Then,
Add events and find “Contact has been added to the stage in the funnel”. Then, ![]() add a condition – “Contact opened email” and finally
add a condition – “Contact opened email” and finally![]() add an action — “Send email to a contact”. Then proceed to event settings.
add an action — “Send email to a contact”. Then proceed to event settings. ![]()
.

Enter the funnel you’ve made before and set Stage for the first one. Save changes. Then go open settings of the link between the event and the condition ![]()
.
![]()
Select Check conditions and specify when you want the check to happen. Save changes. Then go to condition settings. ![]()
.
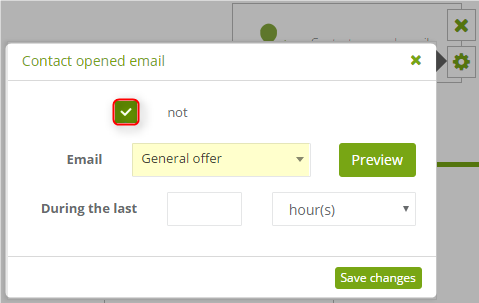
Add a condition “Contact opened email” and select the NOT checkbox to reverse the way this condition works. This means the condition will is met if a contact does not open the email. Save changes and go to action’s settings. ![]()
.
Choose a message which you want to send. For this example, the message was, once again, “General offer”. Save changes. Then create another rule.
.
STEP 4 — Creating the fourth rule
The fourth rule is meant to detect contacts, who opened the email containing the detailed offer and send an email alert to contact owners.
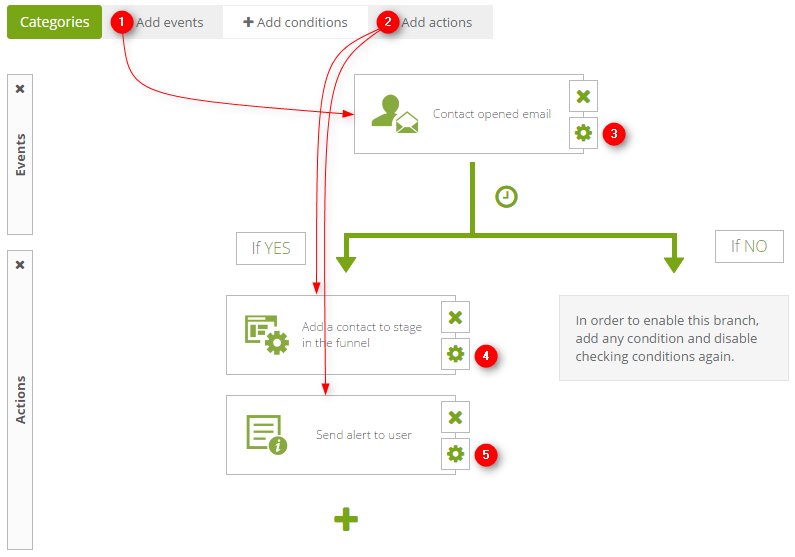
Click ![]() Add events and find “Contact opened email”. Then
Add events and find “Contact opened email”. Then ![]() add two actions — “Add a contact to stage in the funnel” and “Send alert to user”. Then proceed to event settings.
add two actions — “Add a contact to stage in the funnel” and “Send alert to user”. Then proceed to event settings. ![]()
.
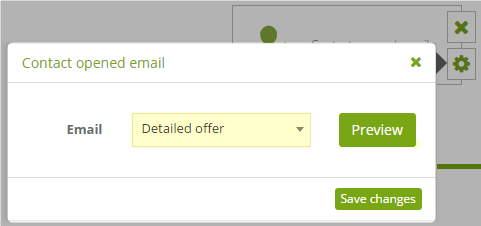
Choose the message that, when opened, will count as an event – in this case, it is going to be “Detailed offer”. Save changes and proceed to the first action’s settings ![]()
.
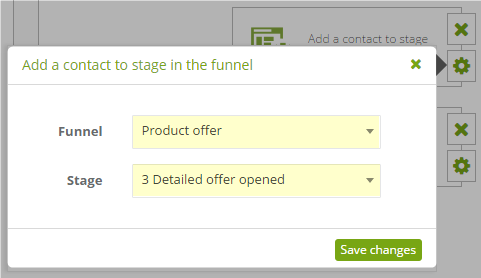
Enter the funnel you’ve made before and set Stage for the third one. Save changes. Proceed to the second action’s settings. ![]()
.
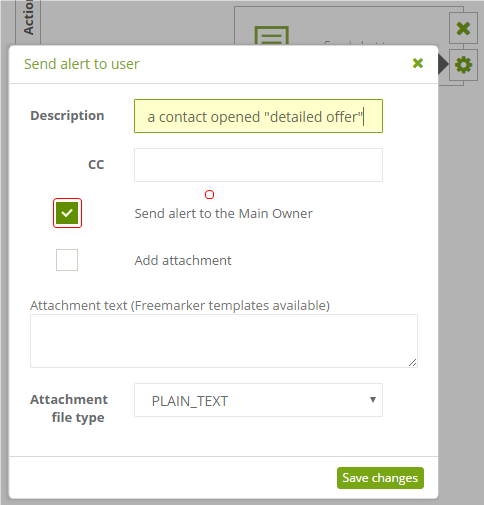
Enter a short description for the alert and select the checkbox as shown. Save changes, save the rules and start creating another rule.
.
STEP 5 — Creating the fifth rule
The fifth rule is much like the previous one. Its function is to find which contacts clicked a link in the email containing the detailed offer and notify contact owners with email alerts.
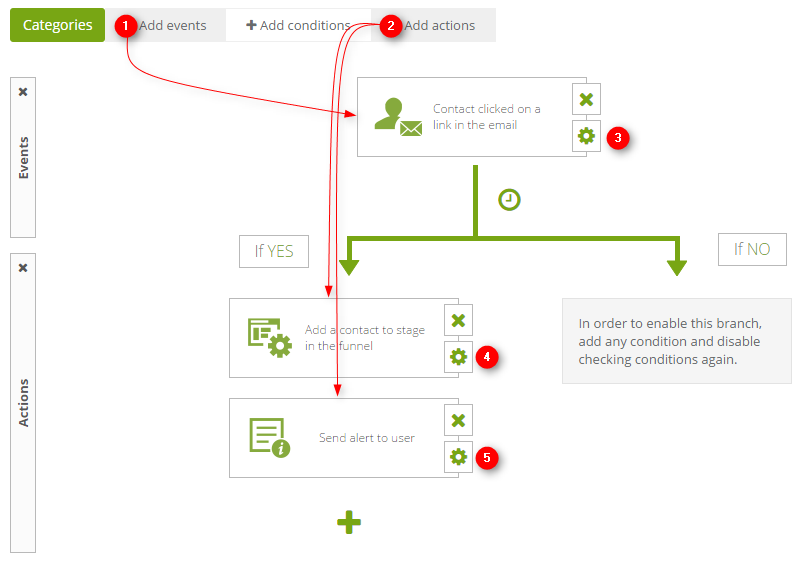
Click ![]() Add events and find “Contact clicked on a link in the email”. Then
Add events and find “Contact clicked on a link in the email”. Then ![]() add two actions — “Add a contact to stage in the funnel” and “Send alert to user”. Then proceed to event settings.
add two actions — “Add a contact to stage in the funnel” and “Send alert to user”. Then proceed to event settings. ![]()
.
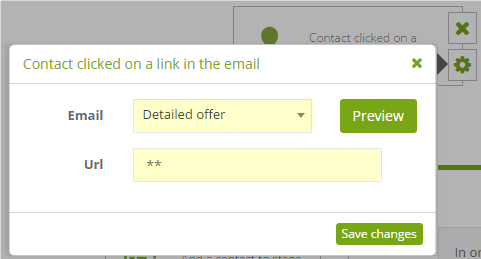
Choose the message that, when opened, will count as an event. Save changes and proceed to the first action’s settings. ![]()
TIP: ** in URL will cause any link click in that message to count as an event for the purpose of this rule, as long as it leads to the monitored site. You can also enter a specific URL here.
.
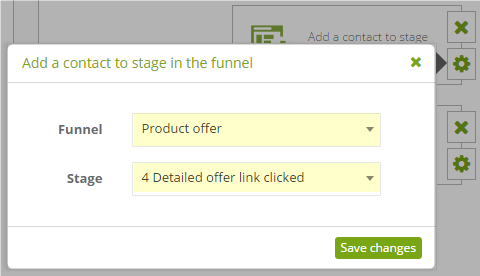
Enter the funnel you’ve made before and set Stage for the fourth one. Save changes. Proceed to the second action’s settings. ![]()
.
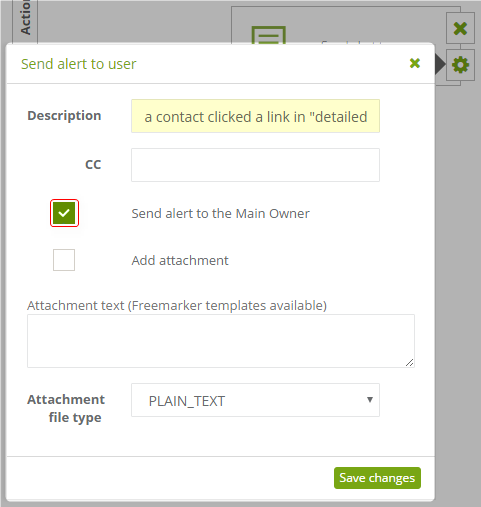
Enter a short description for the alert and select the checkbox as shown. Save changes, save the rule and create the last rule. The one rule to rule them all.
STEP 6 — Creating the sixth rule
The sixth rule’s purpose is to send the detailed offer once more to contacts, who opened the email with “General offer” (and so were placed in stage 2 of the funnel) but did not open the detailed offer (which means they “got stuck” at stage 2).
Click ![]() Add events and find “Contact has been added to the stage in the funnel”. Then add a condition
Add events and find “Contact has been added to the stage in the funnel”. Then add a condition![]() – “Contact opened email” and finally
– “Contact opened email” and finally ![]() add an action — “Send email to a contact”. Then proceed to event settings.
add an action — “Send email to a contact”. Then proceed to event settings. ![]()
.
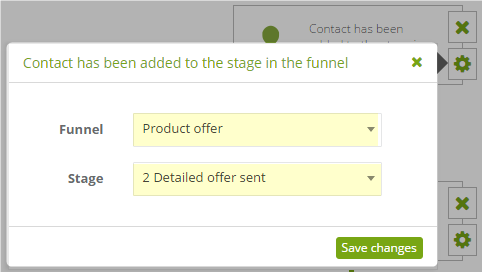
Enter the funnel you’ve made before and set Stage for the second one. Save changes. Then go to condition settings. ![]()
.
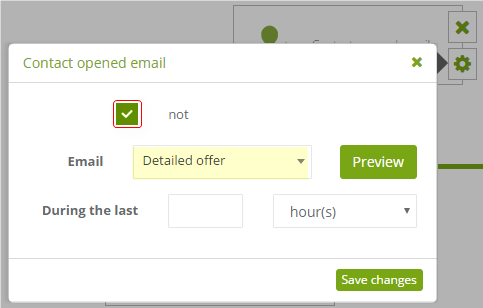
Add a condition “Contact opened email” and select the NOT checkbox to reverse the way this condition works. This means the condition will be met if a contact will not open the email. Save changes and go to action’s settings. ![]()
.
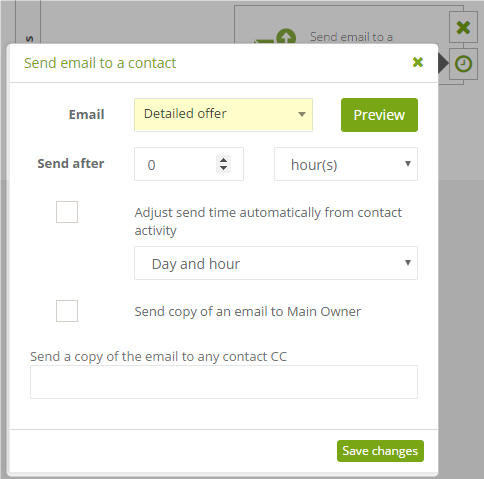
Choose a message which you want to send. For this example, once again, the message was “Detailed offer”. Save changes. Then Save the rule.
.
STEP 7 — Running the campaign
It’s time to put the created automation rules into practice. To do this, go to CRM → Manage contacts.
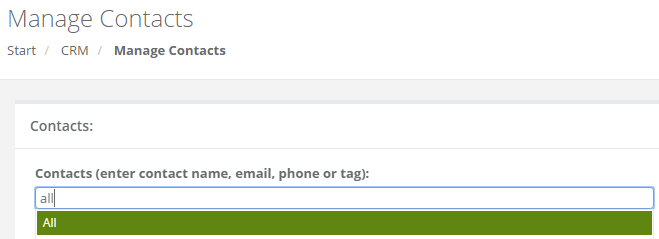
In Contacts you can either type ‘all’ – which will allow you to select all contacts in the database, or enter contacts manually and by using buttons to the right.
.
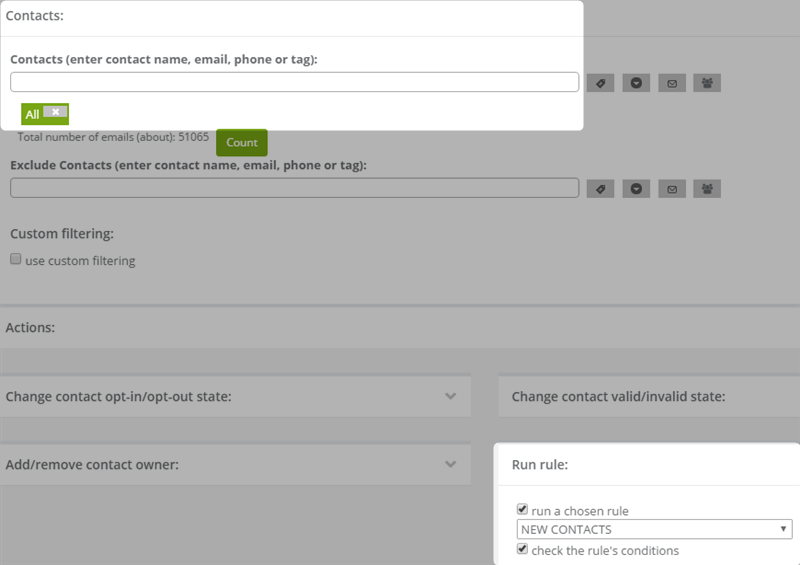
Now, find the Run rule dialogue box, select the appropriate rule and click ![]() to manually run the automation rule. The system will place contacts you selected into the first stage of the funnel and sending them emails with the general offer.
to manually run the automation rule. The system will place contacts you selected into the first stage of the funnel and sending them emails with the general offer.